微服务众多配置文件,每次一个个修改再重启服务,实在太麻烦了。于是想到了spring-cloud-config,它可以为我们提供分布式的配置中心,将配置文件全部放到配置中心,配置中心文件更新后,利用spring-cloud 的消息总线发送到之下的每个服务,从而实现自动化配置。
基础配置中心的搭建
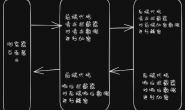
在 Spring Boot 项目中集成 Spring Cloud Config,并以 github或者 本地的gitlab 作为配置存储。除了 git 外,还可以用数据库、svn、本地文件等作为存储。所以首先我们需要在github 或者 gitlab 上配置自己的配置文件仓库。在spring cloud config 组件中,分两个角色,一是config server,二是config client。 config server 从配置中心读取配置,config-client 从config-server 获取配置。
搭建config-server 项目
搭建config-server 项目,我们在我们工程里引入spring-cloud-config-server 的依赖。
其启动类如下:
@SpringBootApplication
@EnableConfigServer
public class ConfigApplication {
    public static void main(String[] args) {
        SpringApplication.run(ConfigApplication.class, args);
    }
}
开启 @EnableConfigServer 注解。
yml 文件配置如下,配置好 git 仓库
server:
  port: 8888
spring:
  application:
    name: config-server
  cloud:
    config:
      server:
        git:
          uri: http://localhost:8008/hello/magic-config.git
          default-label: master
          username: hello
          password: 123456
          search-paths:
          basedir: /mysoft/www/config-git/
      profile: dev
如果Git仓库为公开仓库,可以不填写用户名和密码,如果是私有仓库需要填写。 basedir 可以自定义为git上文件的存放位置
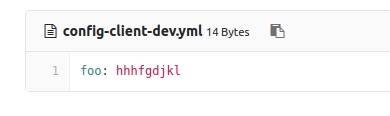
仓库http://localhost:8008/hello/magic-config.git 中有个文件config-client-dev.yml文件中有一个属性
启动程序后访问:http://localhost:8888/foo/dev
有信息返回,正常获取配置。
http请求地址和资源文件映射如下:
/{application}/{profile}[/{label}]
/{application}-{profile}.yml
/{label}/{application}-{profile}.yml
/{application}-{profile}.properties
/{label}/{application}-{profile}.properties
搭建config-client项目
在项目中引入spring-cloud-starter-config 的jar
@SpringBootApplication
@RestController
public class ConfigclientApplication {

    public static void main(String[] args) {
        SpringApplication.run(ConfigclientApplication.class, args);
    }

    @Value("${foo}")
    String foo;
    @RequestMapping(value = "/hi")
    public String hi(){
        return foo;
    }

}
配置文件如下:
server:
  port: 8899
spring:
  application:
    name: config-client
  cloud:
    config:
      label: master
      profile: dev
      uri: http://localhost:8888
      name: config-client-dev
其中 uri 是 config-server 的访问地址,name 是对应的配置文件,当设置了对应的 profile 时一定要对应到对应的配置文件名称,不然有可能出现,无法加载配置的情况。
打开网址访问:http://localhost:8881/hi,加载的配置就是config-server 从配置中心读取的配置了。
分布式配置中心
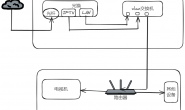
既然是微服务,那么我们就基于微服务做分布式配置,注册中心我们采用nacos,客户端和服务端引入spring-cloud-starter-alibaba-nacos-discovery jar 包。
配置文件增加:
   nacos:
      discovery:
        server-addr: localhost:8848
启动类增加:@EnableDiscoveryClient 注解。
客户端再修改加如下配置,不再使用 uri 的方式配置 config-server ,而是用 service-id 的方式直接从注册中心获取 config-server,这样多个微服务客户端就可以实现分布式配置
spring:
  application:
    name: config-client
  cloud:
    config:
      label: master
      profile: dev
      discovery:
        enabled: true
        service-id: config-server
      name: config-client-dev
    nacos:
      discovery:
        server-addr: localhost:8848
集成spring-cloud-bus 实现自动刷新
Spring Cloud Bus 将分布式的节点用轻量的消息代理连接起来。它可以用于广播配置文件的更改或者服务之间的通讯,也可以用于监控。我们也可以利用Spring Cloud Bus实现通知微服务架构的配置文件的更改。
spring cloud bus 需要消息队列的支撑,我们需要增加 消息队列的支持,客户端和服务端 spring-cloud-starter-bus-amqp ,配置文件中都需要增加消息队列的配置
  rabbitmq:
    host: localhost
    port: 5672
    username: guest
    password: guest
服务端,还需要增加
如下配置:
management:
  endpoints:
    web:
      exposure:
        include: "*"
然后我们向服务端 http://192.168.43.157:8888/monitor 发送 post 请求,就可以完成配置刷新。
如果我们想提交代码时就触发刷新,需要在github或者 gitlab配置 webhook 为对应的地址即可。
参考资料: https://www.fangzhipeng.com/springcloud/2018/08/08/sc-f8-bus.html
https://www.cnblogs.com/fengzheng/p/11242128.html